
Understanding the Basics of a Ledger Live Transfer
Moving digital assets requires a clear process. Understanding how to send crypto using Ledger Live starts with knowing the tools. You need both the Ledger device and the Live app. This guide breaks down each step for a secure send crypto Ledger Live process. Let us remove the confusion around digital transfers.
Many users worry about losing funds during a transaction. Your private keys stay offline on the device. Therefore, any Ledger Live send transaction requires physical confirmation. This adds a layer of security missing from software wallets. Knowing this fact builds confidence for first time senders.
Why Use a Hardware Wallet for Sending Coins?
Software wallets store keys on internet connected devices. This makes them targets for hackers. Choosing to send crypto Ledger Live means using a hardware wallet. Your private keys never touch your computer or phone. Only the signed transaction leaves the device.
This method prevents malware from stealing your funds. Each Ledger Live send transaction requires a button press on the device. Without this physical confirmation, the transfer fails. Using a hardware wallet turns a risky action into a safe one. Control over your assets stays in your hands, not online servers.
Security Advantages of Offline Signing
Private keys remain isolated on the secure chip. Malware on your computer cannot access these keys. Every transaction gets verified on the device screen first. This ensures you send funds to the correct address. Mistakes become preventable through hardware verification.
Comparing Hot Wallets and Cold Storage
Hot wallets like browser extensions offer speed but low security. Cold storage using Ledger provides protection for long term holdings. For frequent traders, using a mix of both works best. However, for any Ledger Live transfer, the cold wallet signs the transaction. This hybrid approach balances convenience with security.
Preparing Your Ledger Device for a Transfer
Before starting a transaction, ensure your device is ready. Checking the battery level for the Nano X is wise. A dead battery during a transfer can cause errors. Connect your device to the computer or phone via the provided cable. Completing a Ledger Live initial configuration is required before sending any coins.
Updating the firmware is equally vital. Outdated software can cause syncing errors. Performing a firmware update Ledger Live ensures compatibility with network changes. Failing to update may block your transaction from processing. Always check for updates inside the Manager section of the app.
Checking Account Balances First
Open the Ledger Live app on your desktop or mobile. Navigate to the specific account you want to send from. Verify the balance covers the amount plus network fees. Sending more than you own results in an error. Account balances sync through the blockchain, not your device.
Installing the Correct Blockchain App
Each cryptocurrency requires a specific app on your device. For Bitcoin, install the Bitcoin app. For Ethereum, install the Ethereum app. Open this app on the device before starting the transfer. The Ledger Live app will prompt you if the app is missing. Installing the wrong app prevents the transaction from signing.
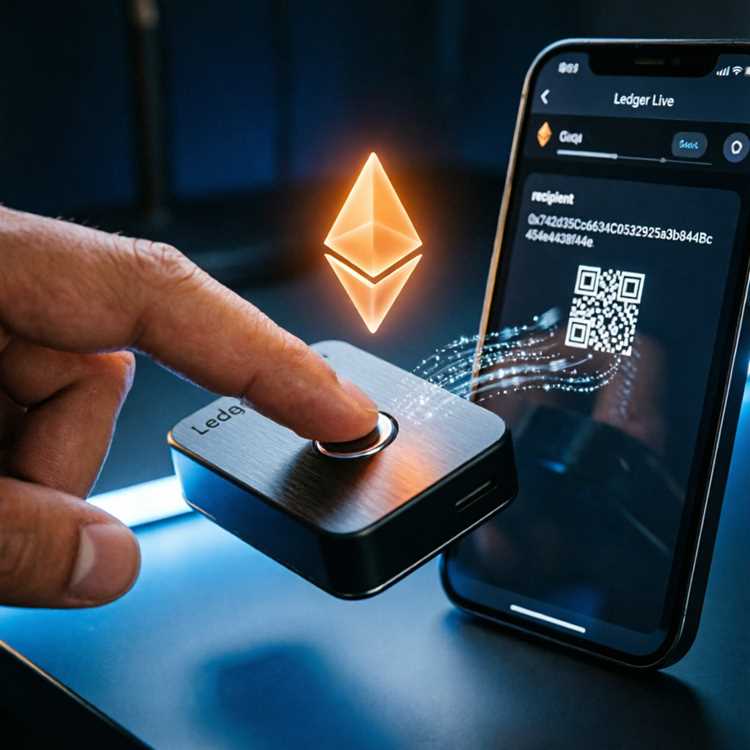
Step by Step Process: Sending Crypto Using Ledger Live
This section provides the exact steps for a successful transfer. Following this order prevents common mistakes. Each action builds on the previous one. Read each step completely before moving forward.
- Open the Ledger Live app on your computer or mobile device.
- Select the account you wish to send from, like Bitcoin or Ethereum.
- Click the "Send" button located in the top right or account menu.
- Enter the recipient's wallet address carefully. Copy and paste to avoid typos.
- Type the amount you want to send. The app shows the total including fees.
- Select the network fee level. Faster confirmations cost more.
- Review the transaction summary on your computer screen.
- Connect your Ledger device and open the relevant blockchain app.
- Verify the address and amount on the device screen.
- Press both buttons to confirm and sign the transaction.
- Wait for the network to confirm the transfer.
Each Ledger Live send transaction follows this exact workflow. Skipping the device verification step cancels the transfer. Always double check the address on the device screen. Hackers can change displayed addresses on your computer. The hardware screen shows the true destination.
Choosing the Right Network Fee
Network fees depend on blockchain congestion and transaction size. Bitcoin fees vary based on bytes of data. Ethereum fees depend on gas price and gas limit. Ledger Live suggests three fee levels: slow, medium, and fast. Selecting a low fee means waiting longer for confirmation.
For time sensitive transfers, choose the medium or fast option. For large amounts, paying a higher fee ensures quicker processing. Checking current network conditions before sending is a good habit. The app shows estimated wait times for each fee level.
Verifying the Recipient Address
Always send a small test transaction for large amounts. This confirms the address works and belongs to the recipient. Scammers sometimes provide fake addresses that look real. Comparing the first and last six characters is not enough. The device screen shows the full address for verification.
Common Errors During Ledger Live Send Transactions
Mistakes happen when users rush through the process. One common error is sending to an unsupported network. For example, sending Ethereum on the Binance Smart Chain network. The recipient may never receive funds if the network mismatches. Always match the network selection in both sender and receiver wallets.
Another error is forgetting to install the blockchain app. The device must have the correct app open. Users sometimes try to send Bitcoin with the Ethereum app open. The transaction prompts an error immediately. Keeping the device app synced with the sending currency prevents this.
Transaction Stuck or Pending for Too Long
A transaction can remain pending if the fee is too low. Network congestion causes delays for low fee transactions. Your transaction stays in the mempool until miners include it. Some wallets allow transaction acceleration for an extra fee. Ledger Live does not currently offer this feature directly.
Waiting is the only option in most cases. Alternatively, you can use a Replace by Fee (RBF) feature if enabled before sending. This allows you to resend the same transaction with a higher fee. Check your transaction status on a blockchain explorer for updates.
Device Not Connecting or Syncing
Connection issues often stem from cable problems. Use the original cable that came with your Ledger. Third party cables may not support data transfer. Restarting both the device and the computer can fix sync errors. A Ledger Live syncing problem can also occur after an update.
Closing other USB applications helps resolve conflicts. Programs like antivirus software can block device communication. Try a different USB port if problems persist. For mobile users, ensuring Bluetooth is on for the Nano X is necessary.
Using Ledger Live on Different Devices
The process works on Windows, Mac, Linux, iOS, and Android. Desktop apps offer a full screen experience with more details. Mobile apps provide convenience for on the go management. Using Ledger Live Android allows you to send crypto without a computer. The steps remain identical across all platforms.
Mobile users connect via Bluetooth for the Nano X or USB OTG cable for the Nano S. Each platform requires the same security checks. The device screen always shows the final transaction details. Trust the device, not the computer or phone display.
Desktop vs. Mobile: Which is Better?
Desktop offers larger screens for checking addresses. Mobile provides portability and quick access. For large amounts, desktop with a wired connection offers stability. For small daily transfers, mobile with Bluetooth is faster. Both options maintain the same security level.
Your choice depends on personal preference and access needs. Having both installed offers flexibility. Just ensure both apps are updated to the latest version. Using an outdated app on either platform risks compatibility issues.
Adding Security Features to Your Transfer Process
Securing your account setup prevents unauthorized access. Setting a strong Ledger Live PIN code adds a first layer of defense. This PIN protects the app from unwanted access on your device. Additionally, using a passphrase creates a hidden wallet for extra privacy.
Never share your recovery phrase with anyone. This phrase can restore all your accounts. Storing it offline in a safe place is critical. Email, cloud storage, or screenshots are never safe. Writing it down on paper and storing it securely is the best method.
Two Factor Authentication and Passphrases

Ledger Live supports U2F two factor authentication for some services. This adds a hardware security key requirement for logins. A passphrase, also known as a 25th word, creates a new wallet. Use this for storing large amounts separately from your daily wallet.
Remembering your passphrase is your own responsibility. Losing it means losing access to those funds. Test your passphrase setup before transferring large sums. This extra step provides strong protection against physical theft.
Managing Ledger Live Passwords Correctly
Using strong Ledger Live passwords for the app login is important. Avoid using simple or reused passwords. Consider using a password manager to generate and store complex passwords. This prevents brute force attacks on the app itself.
Using Ledger Live Swap for Quick Exchanges
Some users want to exchange one crypto for another directly. The Ledger Live swap feature allows this without leaving the app. You can convert Bitcoin to Ethereum or other supported pairs. This avoids sending to an external exchange and back.
Swaps happen through integrated third party providers. Quotes update based on current market rates. Confirm the rate and fees on the device before signing. The process completes when the new coins arrive in your account. This feature adds convenience for portfolio rebalancing.
Benefits of Swapping Inside the App
No need to create accounts on external exchanges. Your coins never leave your control during the swap. The transaction goes directly between providers and your wallet. This reduces exposure to exchange hacks or exit scams. Swapping inside Ledger Live is a safer alternative for many users.
Limitations and Fees for Swaps
Swap fees are often higher than direct exchange trading fees. The convenience comes at a cost. Supported coin pairs are also limited compared to major exchanges. For large volumes, using a dedicated exchange might be cheaper. However, for small to medium swaps, the ease of use wins.
Check the swap rate against current market prices. Some providers include hidden markups in the rate. Always compare the final amount you will receive. Using swap for small amounts makes sense for most users.
Staking Coins After Receiving Them
After completing a transfer, consider making your coins work. Using Ledger Live staking allows you to earn rewards on certain assets. Coins like Tezos, Polkadot, and Ethereum can generate passive income. Staking locks your coins for a period but rewards you in return.
Starting staking requires a minimum amount of the specific coin. Rewards distribute periodically based on network rules. The process is automatic after you delegate your coins to a validator. Your coins remain in your Ledger accounts throughout the process.
How Staking Differs From Sending
Sending moves coins to another address. Staking keeps coins in your wallet but delegates them. No transfer of ownership occurs during staking. You can stop staking at any time to send coins again. Understanding this difference helps plan your asset management.
Supported Staking Assets on Ledger Live
Currently supported assets include Tezos, Cosmos, Solana, and Polkadot. The list grows as networks adopt proof of stake. Check the Earn section in Ledger Live for available options. Rewards rates vary based on network inflation and validator performance. Choose a validator with good uptime and fair fees.
Frequently Asked Questions About Sending Crypto
Q: How long does a Ledger Live send transaction take?
A: Time depends on network congestion and fee chosen. Bitcoin can take 10 to 60 minutes. Ethereum usually completes in under 5 minutes with a proper fee.
Q: Can I cancel a transaction after sending?
A: Once signed and broadcast, you cannot cancel it. The network processes it. Ensure all details are correct before pressing confirm.
Q: What happens if I send to the wrong address?
A: Transactions on blockchain are irreversible. Recovering funds is nearly impossible. Always triple check the address on the device screen.
Q: Do I need the Ledger device connected for the whole process?
A: No. You only need it for the signing step. Prepare the transaction on the app first. Connect the device just before confirming.
Q: Is there a limit on how much I can send?
A: No limit exists in the software. Network fees scale with transaction size. Very large transactions may require higher fees for priority.
Final Summary: Sending Crypto With Confidence
Learning how to send crypto using Ledger Live empowers you with control. Following each step carefully ensures a smooth send crypto Ledger Live experience. Your hardware wallet provides unmatched security for every Ledger Live transfer. Trusting the device screen over the computer display prevents fraud.
Always test a small amount first for new addresses. Keep your recovery phrase stored safely offline. Update your firmware regularly for the best performance. By following this guide, you can withdraw crypto Ledger with confidence.
| Accessory | Price Range | Compatibility | Use Case |
|---|---|---|---|
| Ledger Nano S Plus | 79 USD | Desktop, Mobile (OTG) | Entry level cold storage |
| Ledger Nano X | 149 USD | Desktop, Mobile (Bluetooth) | Portable advanced storage |
| Ledger Stax | 279 USD | Desktop, Mobile (Bluetooth) | Premium touch screen model |
| USB Cable (Original) | 10 15 USD | All Ledger devices | Replacement or backup cable |
| Hardware Wallet Case | 20 30 USD | Nano X and Stax | Physical protection during travel |
| Recovery Phrase Metal Plate | 30 50 USD | Universal | Fire and water resistant backup |